

377Uploads
150k+Views
9k+Downloads
Maths for early years
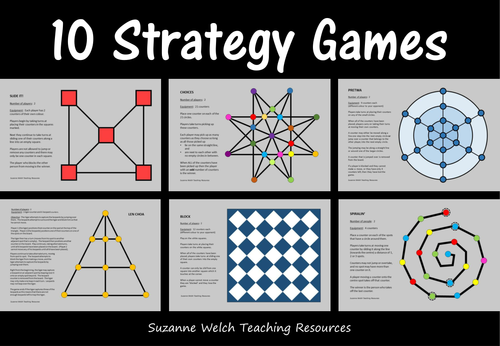
Strategy Board Games for Critical Thinking
This is a set of 10 board games that work on STRATEGY rather than CHANCE.
The only equipment you need is counters/markers.
Provided in both colour and black/white.
Easy-to-follow instructions are written on the game boards.
All games are for 2 players.
These games develop skills such as:
♦ strategic thinking
♦ logical thinking
♦ spatial perception
♦ planning ahead
♦ social interaction (not played on a screen!)
Games:
♦ Spiralin’
♦ Slide it!
♦ Sandwich
♦ Choices
♦ Pretwa
♦ Block
♦ Len Choa
♦ Nine Holes
♦ Tapatan
♦ Nine Field Kono
Designed on A4 size paper.
**********************************************************************
© Suzanne Welch Teaching Resources

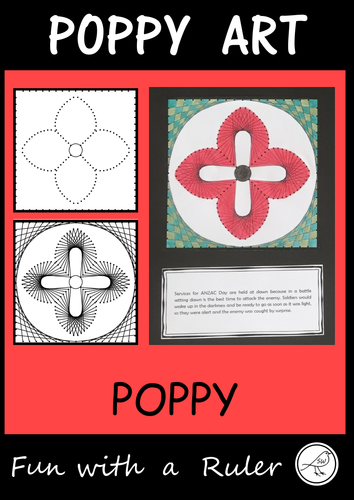
Poppy Art – Remembrance Day, Memorial Day, Armistice Day, Anzac Day.
A ‘Fun with a Ruler’ art project for your students to complete leading up to Remembrance Day / Memorial Day / Armistice Day / Anzac Day.
This project involves your students ruling straight lines between 2 dots on a template, to create a poppy. Your students could write something in the petals before colouring (eg facts, opinons, a 4 line poem, etc). Display them together to make a 'poppy patchwork quilt'.
Included:
♦ Template – black dots
♦ Template – light grey dots
♦ Example – black/white
♦ Instructions
♦ Teacher notes
Level of Difficulty:
Your students need to be able to use a ruler to draw straight lines between 2 points (the curves are made with straight lines … it’s like magic!). The design looks more complicated than it actually is. Concentration is required, but the actual process is not difficult. A pattern is repeated 8 times.
Instructions:
Simple, clear, easy-to-follow instructions are provided. One instruction per page (image and a sentence). Display the instructions via a data projector if you have access to one. Otherwise print and enlarge them and/or demonstrate on an enlarged template.
Equipment:
You need a ruler and a pen (black works best). Something to colour with (eg coloured pencils, watercolours, felt tip markers, chalk pastels, dye, etc)
Size:
The artwork measures approximately 17cm x 17cm. Designed on A4 size paper.
Keywords: string art, parabolic curves, math, geometry, patterns, war, symbolism, veteran,
© Suzanne Welch Teaching Resources

Christmas Art - Angels
A ‘Fun with a Ruler’ art project for your students to complete during the Christmas season. There are 3 different templates to create 3 slightly different angels.
This project involves your students ruling straight lines between 2 dots on a template. When they have finished drawing all of the lines they can give the head some detail (hair, eyes, mouth, etc) and give their artwork some colour.
Included:
♦ 3x templates – black dots
♦ 3x examples – black/white
♦ 3 x instructions
♦ Teacher notes
Level of Difficulty:
Your students need to be able to use a ruler to draw straight lines between 2 points (the curves are made with straight lines … it’s like magic!). The designs can look more complicated than they actually are. Concentration is required, but the actual process is not difficult.
Instructions:
Simple, clear, easy-to-follow instructions are provided. One instruction per page (image and a sentence). Display the instructions via a data projector if you have access to one. Otherwise print and enlarge them and/or demonstrate on an enlarged template.
Equipment:
You need a ruler and a pen (black works best). Something to colour with (eg coloured pencils, watercolours, felt tip markers, chalk pastels, dye, etc)
Keywords: parabolic curves, math, geometry, patterns, string art, Xmas
© Suzanne Welch Teaching Resources
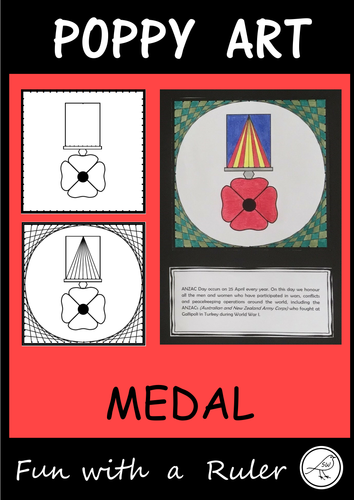
Poppy Art – ANZAC Day, Remembrance Day, Memorial Day, Armistice Day, etc (Design C)
A super-fun art project for your students when celebrating special days such as:
♦ ANZAC Day
♦ Remembrance Day
♦ Memorial Day
♦ Armistice Day
This project involves your students ruling straight lines between 2 dots on a template, to create poppy inspired art work. This is Design C (medal).
Included:
♦ Template
♦ Example – black/white and colour
♦ Instructions
Level of Difficulty:
Your students need to be able to use a ruler to draw straight lines between 2 points (even the curves are made with straight lines … it’s like magic!). The designs look more complicated than they actually are. Concentration is required, but the actual process is not difficult.
Instructions:
Simple, clear, easy-to-follow instructions are provided. One instruction per page (image and a sentence). Display the instructions via a data projector if you have access to one. Otherwise print and enlarge them and/or demonstrate on an enlarged template.
Equipment Needed:
You need a ruler and a pen (black works best). Something to colour with (eg coloured pencils, watercolours, felt tip markers, chalk pastels, dye, etc)
Size:
The artwork measures approximately 17cm x 17cm. Designed on A4 size paper.
This is Design C (medal). Other designs are also available in my store:
Design A - wreath
Design B - cross
Design D - poppy
Keywords: string art, parabolic curves, math, geometry, patterns, war, symbolism, veteran
**********************************************************************
© Suzanne Welch Teaching Resources
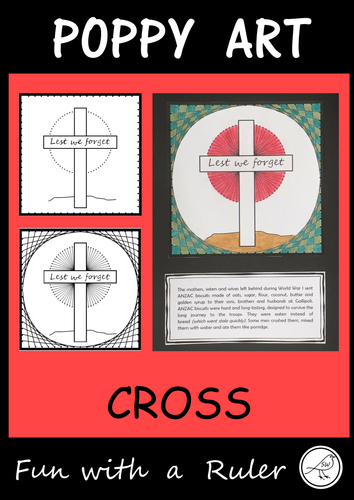
Poppy Art – ANZAC Day, Remembrance Day, Memorial Day, Armistice Day, etc (Design B)
A super-fun art project for your students when celebrating special days such as:
♦ ANZAC Day
♦ Remembrance Day
♦ Memorial Day
♦ Armistice Day
This project involves your students ruling straight lines between 2 dots on a template, to create poppy inspired art work. This is Design B (cross).
Included:
♦ Template
♦ Example – black/white and colour
♦ Instructions
Level of Difficulty:
Your students need to be able to use a ruler to draw straight lines between 2 points (even the curves are made with straight lines … it’s like magic!). The designs look more complicated than they actually are. Concentration is required, but the actual process is not difficult.
Instructions:
Simple, clear, easy-to-follow instructions are provided. One instruction per page (image and a sentence). Display the instructions via a data projector if you have access to one. Otherwise print and enlarge them and/or demonstrate on an enlarged template.
Equipment Needed:
You need a ruler and a pen (black works best). Something to colour with (eg coloured pencils, watercolours, felt tip markers, chalk pastels, dye, etc)
Size:
The artwork measures approximately 17cm x 17cm. Designed on A4 size paper.
Other designs are also available (in my store):
* Design A - wreath
* Design C - medal
* Design D - poppy
© Suzanne Welch Teaching Resources
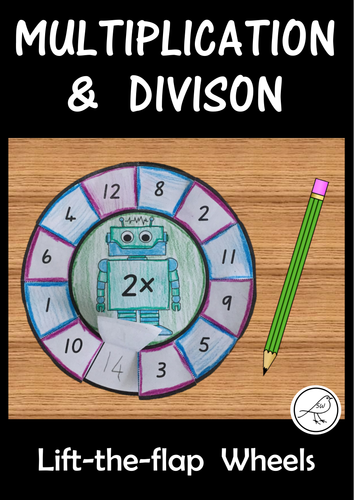
Multiplication and Division Wheels - lift the flap
Multiplication and Division wheels for the x1 to x12 facts.
A great ‘craftivity’ to help your students learn and practise the instant recall of their multiplication and division facts.
How to make:
♦ colour / decorate
♦ cut out the two wheels and along the dotted lines between the numbers
♦ glue the top and bottom wheels together (in the centre only)
♦ fold back the flaps
♦ write the answers under the flaps
♦ ready to use!
Two formats:
♦ with a robot graphic.
♦ plain so your students can decorate and personalise their own wheel.
Included:
♦ 12 multiplication wheels with a robot graphic.
♦ 12 multiplication wheels without a graphic.
♦ 12 division wheels with a robot graphic.
♦ 12 division wheels without a graphic.
♦ Instruction sheet.
Designed on A4 size paper.
The font used is ‘NZ Basic Script’. The number shapes are the same as those recommended in the NZ Ministry of Education Handbook – ‘Teaching Handwriting’.
**********************************************************************
© Suzanne Welch Teaching Resources
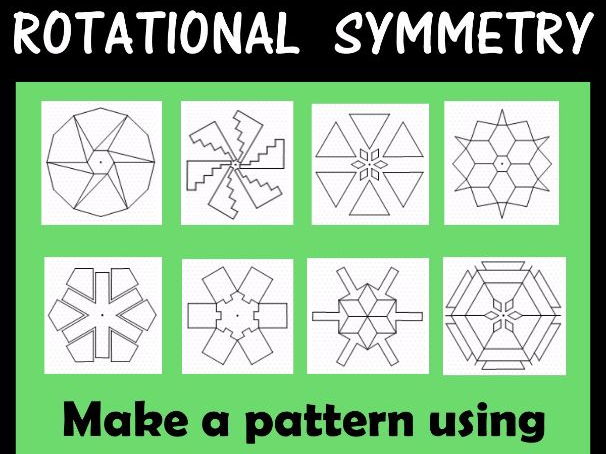
Rotational Symmetry – Art activity – Maths (Geometry)
Rotational Symmetry Art Activity.
This fun activity produces fantastic designs that your students will be super proud of.
Each template has rotational symmetry of order 6 and is on isometric dot paper. Your students simply add more lines (ensuring each line is done 6 times to keep it symmetrical), using the dots to maintain accuracy. When your students are happy with their final design they can colour it in using symmetrical colouring.
Afterwards, your students may wish to cut their design out and use it in another piece of artwork. For example, adding a stem and leaves to turn it into a flower.
Plain isometric dot paper has also been provided as a basis for your students to create their own rotational symmetry design from scratch.
Provided as two separate files – A4 paper size and Letter paper size.
What you get:
• 30 templates on isometric dot paper
• Poster explaining rotational symmetry
• Isometric dot paper (plain)
• Teacher notes
© Suzanne Welch Teaching Resources
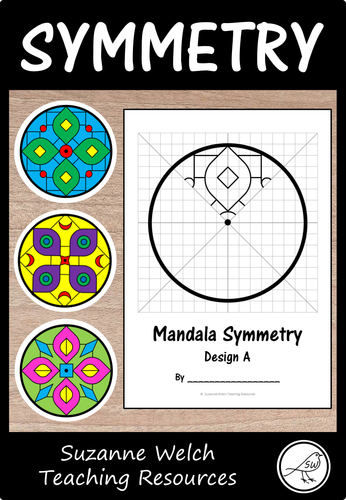
Math Art – Rotational Symmetry – Mandala Patterns
A fun activity for your students when studying geometry or cultural celebrations such as Diwali (The Festival of Lights).
Students use the grid lines and lines of symmetry to help them draw the pattern in the other sections of the circle. The lines are light grey and they will become less visible after colouring.
Included:
♦ 3 different patterns
♦ Blank template (students can make up their own pattern)
For each of the 3 patterns:
♦ student template with grid lines.
♦ completed student template (great as a reference during the lesson).
♦ the pattern without the grid lines (could be used as a simple colouring activity if desired).
An example of what is included for each of the 3 patterns is included in the images.
Provided in 2 different paper sizes:
♦ A4 size paper
♦ Letter size paper
Make ... colour ... cut ... display
The blank template includes: grid lines, lines of symmetry, outer circle.
© Suzanne Welch Teaching Resources
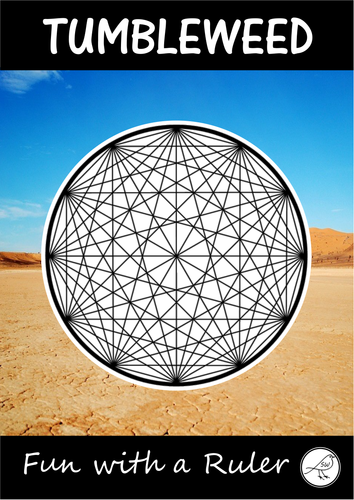
Math Art - Fun with a Ruler - Tumbleweed
A ‘Fun with a Ruler’ math/art project for your students. This project involves your students ruling straight lines between 2 dots on a template. When they have finished drawing all of the lines they can give their artwork some colour.
Included:
♦ Template
♦ Example
♦ Instructions
♦ Teacher notes
Level of Difficulty:
Your students need to be able to use a ruler to draw straight lines between 2 points. The design can look more complicated than it actually is. Concentration is required, but the actual process is not difficult.
Instructions:
Simple, clear, easy-to-follow instructions are provided. One instruction per page (image and a sentence). Display the instructions via a data projector if you have access to one. Otherwise print and enlarge them and/or demonstrate on an enlarged template.
Equipment:
You need a ruler and a pen (black works best). Something to colour with (eg coloured pencils, watercolours, felt tip markers, chalk pastels, dye, etc)
Size:
The circle is approximately18cm in diameter. Designed on A4 size paper.
Keywords: string art, math, geometry, patterns, lines, ruler.
© Suzanne Welch Teaching Resources
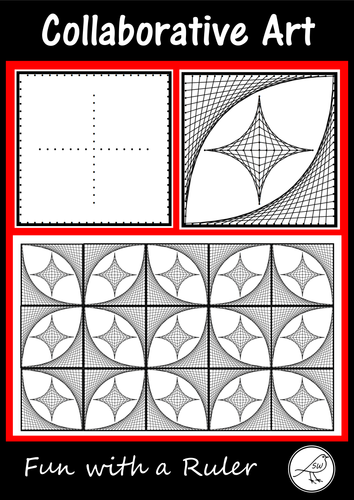
Fun with a Ruler - Collaborative Art Project using Parabolic Curves
A ‘Fun with a Ruler’ art project that involves drawing parabolic curves (curves that are made by drawing a series of straight lines).
This project involves your students ruling straight lines between 2 dots on a template. When they have finished drawing all of the lines they can give their artwork some colour.
Each student completes a square. Join the squares together to make an eye-catching display (see image for example).
Included:
♦ Template – black dots
♦ Template – light grey dots
♦ Example
♦ Display suggestion
♦ Instructions
♦ Teacher notes
Level of Difficulty:
Your students need to be able to use a ruler to draw straight lines between 2 points (the curves are made with straight lines … it’s like magic!). The designs can look more complicated than they actually are. Concentration is required, but the actual process is not difficult.
Instructions:
Simple, clear, easy-to-follow instructions are provided. One instruction per page (image and a sentence). Display the instructions via a data projector if you have access to one. Otherwise print and enlarge them and/or demonstrate on an enlarged template.
Equipment:
You need a ruler and a pen (black works best). Something to colour with (eg coloured pencils, watercolours, felt tip markers, chalk pastels, dye, etc)
Size:
Each square measures approximately 18.5cm x 18.5cm. Designed on A4 size paper.
Keywords: string art, math, geometry, patterns, parabolic curves.
© Suzanne Welch Teaching Resources
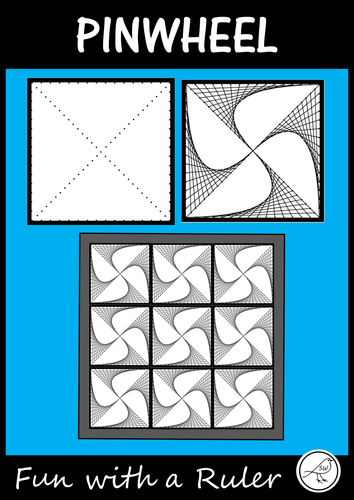
Math Art – Parabolic Curves - Pinwheel
A ‘Fun with a Ruler’ math/art project that uses parabolic curves to make an interesting ‘pinwheel’ design.
This project involves your students ruling straight lines between 2 dots on a template. When they have finished drawing all of the lines they can give their artwork some colour.
Included:
♦ Template (black or grey dots)
♦ Example
♦ Instructions
♦ Teacher Notes
There are 2 different templates to choose from. One of them is more suitable for older students as more care needs to be taken in ‘congested’ areas of the design. The designs are the same (one just has more dots/lines).
Level of Difficulty:
Your students need to be able to use a ruler to draw straight lines between 2 points (the curves are made with straight lines … it’s like magic!). The designs can look more complicated than they actually are. Concentration is required, but the actual process is not difficult.
Instructions:
Simple, clear, easy-to-follow instructions are provided. One instruction per page (image and a sentence). Display the instructions via a data projector if you have access to one. Otherwise print and enlarge them and/or demonstrate on an enlarged template.
Equipment:
You need a ruler and a pen (black works best). Something to colour with (eg coloured pencils, watercolours, felt tip markers, chalk pastels, dye, etc)
Size:
The design is 17.5cm x 17.5cm. Designed on A4 size paper.
Keywords: string art, math, geometry, patterns, parabolic curves
© Suzanne Welch Teaching Resources
Poppy Art – ANZAC Day, Remembrance Day, Memorial Day, Armistice Day (Design D)
A super-fun art project for your students when celebrating special days such as:
♦ ANZAC Day
♦ Remembrance Day
♦ Memorial Day
♦ Armistice Day
This project involves your students ruling straight lines between 2 dots on a template, to create poppy inspired art work. This is Design D (poppy).
Included:
♦ Template
♦ Example – black/white and colour
♦ Instructions
Level of Difficulty:
Your students need to be able to use a ruler to draw straight lines between 2 points (even the curves are made with straight lines … it’s like magic!). The designs look more complicated than they actually are. Concentration is required, but the actual process is not difficult.
Instructions:
Simple, clear, easy-to-follow instructions are provided. One instruction per page (image and a sentence). Display the instructions via a data projector if you have access to one. Otherwise print and enlarge them and/or demonstrate on an enlarged template.
Equipment Needed:
You need a ruler and a pen (black works best). Something to colour with (eg coloured pencils, watercolours, felt tip markers, chalk pastels, dye, etc)
Size:
The artwork measures approximately 17cm x 17cm. Designed on A4 size paper.
This is Design D (poppy). Other designs are also available in my store:
Design A - wreath
Design B - cross
Design C - medal
Keywords: string art, parabolic curves, math, geometry, patterns, war, symbolism, veteran
**********************************************************************
© Suzanne Welch Teaching Resources
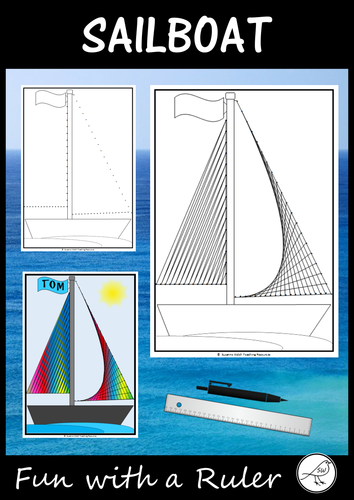
Math Art - Fun with a Ruler - Sailboat
A ‘Fun with a Ruler’ math/art project for your students. This project involves your students ruling straight lines between 2 dots on a template. One set of lines makes a parabolic curve and the other set makes a zig-zag pattern. When they have finished drawing all of the lines they can give their artwork some colour.
Included:
♦ Template
♦ Example – black/white
♦ Example - coloured
♦ Instructions
♦ Teacher notes
Level of Difficulty:
Your students need to be able to use a ruler to draw straight lines between 2 points (the curves are made with straight lines … it’s like magic!). The designs can look more complicated than they actually are. Concentration is required, but the actual process is not difficult.
Instructions:
Simple, clear, easy-to-follow instructions are provided. One instruction per page (image and a sentence). Display the instructions via a data projector if you have access to one. Otherwise print and enlarge them and/or demonstrate on an enlarged template.
Equipment:
You need a ruler and a pen (black works best). Something to colour with (eg coloured pencils, watercolours, felt tip markers, chalk pastels, dye, etc)
Designed on A4 size paper.
Keywords: string art, math, geometry, patterns, parabolic curves, water, ocean, wind, sport
© Suzanne Welch Teaching Resources
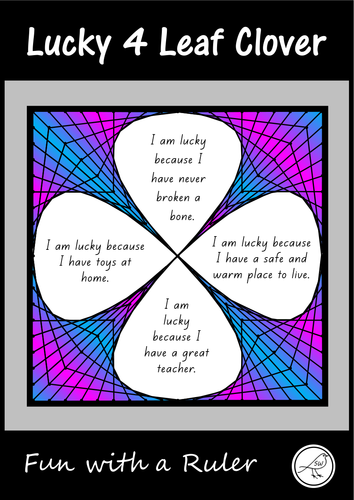
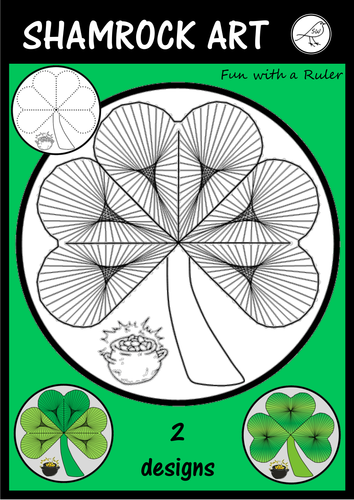
Lucky 4 Leaf Clover – Fun with a Ruler
This art activity can be used for any theme, not just as a ‘lucky four leaf clover’.
The activity involves your students ruling straight lines between 2 dots on a template. When they have finished drawing all of the lines they can give their artwork some colour. The example shows writing in each leaf, but you can change this if you wish.
Included:
♦ Template – black dots
♦ Template – light grey dots
♦ Example
♦ Instructions
♦ Teacher notes
♦ Coloured example
Level of Difficulty:
Your students need to be able to use a ruler to draw straight lines between 2 points (the curves are made with straight lines … it’s like magic!). The designs can look more complicated than they actually are. Concentration is required, but the actual process is not difficult.
Instructions:
Simple, clear, easy-to-follow instructions are provided. One instruction per page (image and a sentence). Display the instructions via a data projector if you have access to one. Otherwise print and enlarge them and/or demonstrate on an enlarged template.
Practise Tempate:
A practise template is included for your students to practise ruling the pattern before you give them the actual template.
Equipment:
You need a ruler and a pen (black works best). Something to colour with (eg coloured pencils, watercolours, felt tip markers, chalk pastels, dye, etc)
Size:
The square is approximately 17cm x 17cm. Designed on A4 size paper.
Keywords: St Patrick's Day, Ireland, Irish, string art, math, geometry, patterns, parabolic curves.
© Suzanne Welch Teaching Resources

Poppy Art – ANZAC Day, Remembrance Day, Memorial Day, Armistice Day, etc (Design A)
A super-fun art project for your students when celebrating special days such as:
♦ ANZAC Day
♦ Remembrance Day
♦ Memorial Day
♦ Armistice Day
This project involves your students ruling straight lines between 2 dots on a template, to create poppy inspired art work. This is Design A (wreath).
Included:
♦ Template
♦ Example – black/white and colour
♦ Instructions
Level of Difficulty:
Your students need to be able to use a ruler to draw straight lines between 2 points (even the curves are made with straight lines … it’s like magic!). The designs look more complicated than they actually are. Concentration is required, but the actual process is not difficult.
Instructions:
Simple, clear, easy-to-follow instructions are provided. One instruction per page (image and a sentence). Display the instructions via a data projector if you have access to one. Otherwise print and enlarge them and/or demonstrate on an enlarged template.
Equipment Needed:
You need a ruler and a pen (black works best). Something to colour with (eg coloured pencils, watercolours, felt tip markers, chalk pastels, dye, etc)
Size:
The artwork measures approximately 17cm x 17cm. Designed on A4 size paper.
These designs are also available (in my store):
* Design B - cross
* Design C - medal
* Design D - poppy
Keywords: string art, parabolic curves, math, geometry, patterns, war, symbolism, veteran
© Suzanne Welch Teaching Resources
St Patrick's Day Art - Shamrock
A ‘Fun with a Ruler’ art project for your students to complete on St Patrick’s Day. There are 2 different templates to choose from.
This project involves your students ruling straight lines between 2 dots on a template. When they have finished drawing all of the lines they can give their artwork some colour.
There is space at the bottom of each template for a writing task that you may wish to set (eg ‘If I found a pot of gold I would …’). If you don’t want this, simply cut the artwork out when finished.
Included:
♦ Shamrock with pot of gold.
♦ Shamrock without pot of gold.
♦ Shamrock – draw your own stem, without pot of gold.
♦ Practise template.
♦ Example of the completed design.
♦ Instructions.
The templates are provided in both black and light grey dots.
Level of Difficulty:
Your students need to be able to use a ruler to draw straight lines between 2 points. The designs can look more complicated than they actually are. Concentration is required, but the actual process is not difficult.
Instructions:
Simple, clear, easy-to-follow instructions are provided. One instruction per page (image and a sentence). Display the instructions via a data projector if you have access to one. Otherwise print and enlarge them and/or demonstrate on an enlarged template.
Practise Tempate:
A practise template is included for your students to practise ruling the pattern before you give them the actual template.
Equipment:
You need a ruler and a pen (black or green works best for this project). Something to colour with (eg coloured pencils, watercolours, felt tip markers, chalk pastels, dye, etc)
Keywords: string art, math, geometry, patterns, Ireland, Irish, luck.
© Suzanne Welch Teaching Resources
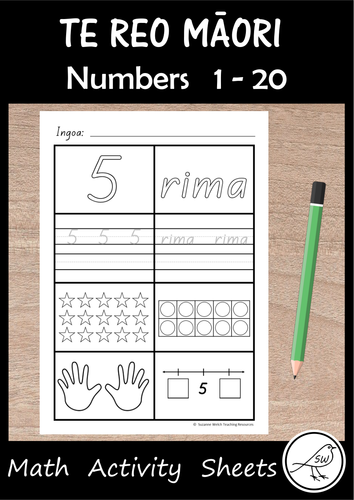
Te Reo Māori – Math Activity Sheets – Numbers 1-20
A set of number activity sheets for use during math lessons when working on numbers 1-20.
The worksheets for numbers 1-10 are slightly different from the worksheets for numbers 11-20.
Worksheets 1-10
♦ Write your name.
♦ Colour the numeral.
♦ Colour the word.
♦ Trace the numeral; write the numeral independently.
♦ Trace the word; write the word independently.
♦ Show a group by circling and colouring the stars.
♦ Show the number on the tens frame (colour the circles).
♦ Colour the correct number of fingers.
♦ Write the number that comes before / after.
Worksheets 11-20
♦ Write your name.
♦ Colour the numeral.
♦ Colour the words.
♦ Trace the numerals and words.
♦ Write the numerals and words independently.
♦ Show a group by circling and colouring the stars.
♦ Show the number on the tens frames (colour the circles).
♦ Fill in the 6 missing numbers on the number line.
**********************************************************************
© Suzanne Welch Teaching Resources
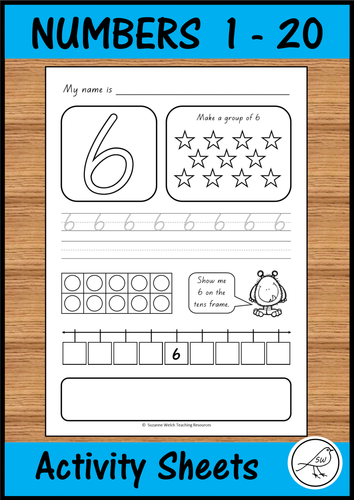
Numbers 1-20 - Activity Sheets
Four sets of activity sheets for numbers 1-20. These are great for differentiating the learning in your classroom.
The font used is ‘NZ Basic Script’. The number shapes are the same as those recommended in the NZ Ministry of Education Handbook – ‘Teaching Handwriting’.
SET A (1-20):
♦ Colour the number
♦ Draw a circle around the correct number of stars and colour
♦ Trace the numbers
♦ Write the numbers
♦ You choose – eg. draw 10 balls, write facts (eg 8+2=10), write 10 ten times.
SET B (1-10):
The same as Set A except there are 2 hand prints in the ‘you choose’ section. Students colour the number of fingers. Activity sheets for numbers 1-10 only.
SET C (1-20):
♦ Colour the number
♦ Draw a circle around the correct number of stars and colour
♦ Trace the numbers
♦ Write the numbers
♦ Show the number on the tens frame by colouring the circles
♦ Write the missing numbers on the number line
♦ You choose – eg. draw 10 balls, write facts (eg 8+2=10), write 10 ten times.
SET D (1-20):
♦ Colour the number
♦ Trace the number
♦ Write the number
♦ Trace the word
♦ Write one more and one less on the number line
♦ Show the number on the tens frame by colouring the circles
♦ Odd or even? Colour the correct circle/word
♦ Write the number of tens and ones
♦ You choose – eg. draw 5 cats, write facts (eg 4+1=5), write 5 five times.
Made on A4 size paper.
70 activity sheets in total.
**********************************************************************
© Suzanne Welch Teaching Resources
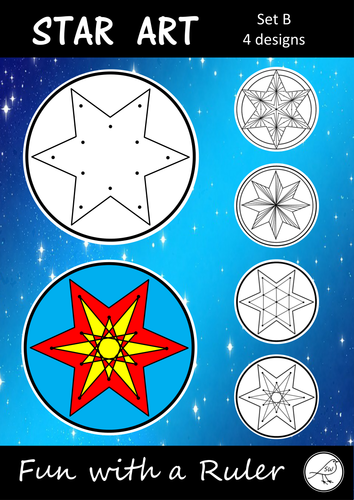
Star Art – Templates – Set B
Fun With Lines. Dotty templates to create 4 different stars. Simply draw straight lines connecting the dots on the templates and wonderful designs will appear … such fun!
This is Set B.
Included:
♦ 4 different star templates
♦ Example stars – black lines
♦ Example stars - coloured
♦ Easy-to-follow instructions (with images)
The Process:
♦ Draw the lines.
♦ Add colour.
♦ Cut it out.
♦ Display.
The Instructions:
I have provided step-by-step instructions that show you how to complete the artwork. Each step is on one page with concise, kid-friendly instructions and an image. Print them out or display via a data projector – a great way for your students to self-check and manage their own learning. (Plus, it will save you from having to answer millions of “Is this right?” questions!)
Great for a topic study on Space or for celebrations such as Matariki (Māori New Year).
This is Set B. Set A is also available in my store.
**********************************************************************
© Suzanne Welch Teaching Resources

Math Basic Fact Cards – Set 1 - Addition
60 basic fact cards with addition questions (using numerals 0 to 10)
20 questions per card.
Answers are on the back of the card (great for self-marking)
Each card has the same level of difficulty.
Every second question is in bold font.
All questions/answers are numbered 1-20.
Examples of questions:
4+2
6+7
0+9
8+8
Ideas for using these cards in your classroom:
♦ daily practise.
♦ warm up math activity.
♦ math rotation activity.
♦ independent math centre activity.
♦ early finisher activity.
♦ math challenge activity (eg complete 3 cards in 3 minutes with 100% accuracy)
What you need to do:
Print, cut, fold and laminate the cards. (They need to be folded so the question is on the front and the answer is on the back). If you purchase additional sets (see below) then I suggest you print them onto coloured paper to differentiate them.
Made on A4 size paper.
4 cards per sheet.
Each card is approximately 45mm by 135mm.
The font is Calibri size 14.
10 different sets of basic fact cards are available in my store:
SET 1 – addition
SET 2 – subtraction
SET 3 – addition and subtraction
SET 4 – addition and subtraction with a missing number or sign (eg 4+=9 or 31=4)
SET 5 – multiplication (0x0 to 12x12)
SET 6 – division
SET 7 – multiplication and division
SET 8 – addition, subtraction, multiplication and division
SET 9 – add/sub/mult/div with a missing number or sign (eg. x4=36 or 279=3)
SET 10 – add/sub/mult/div with brackets eg. (3+4) x (12-2)
Please note that these sets of basic fact cards are also part of my 'BASIC FACT BLACK BELT CHALLENGE.
© Suzanne Welch Teaching Resources